Showing posts with label Geometry. Show all posts

Friday, December 15, 2023

Developing Some Triangle Properties in Grade 9

Triangle properties are now a part of the grade 9 de-streamed math curriculum and after doing some circle properties in a couple of classes, I tried a couple of activities intended to help students develop two important triangle properties. As usual, I wanted to use a concrete-diagrammatic-symbolic approach to this.

 I began by showing students this daigram and asking students what type of triangle it was:

Without exception, all students said it was an isosceles triangle...

I then gave each pair of students five segments of pre-cut stirrers and asked the students to measure them:
The lengths of these segments were 3 cm, 4 cm, 4 cm, 5 cm and 8 cm. I then asked the students to choose any 3 segments and see if they made a triangle with the condition that the segments must all join at a vertex. 
After about 5 minutes, I asked students to give me examples recorded the results as shown below:
I told the students that I would be able to say if there examples were correct by using a special property that I knew of. So when one group of students said that the 8 cm , 4 cm, 4 cm segments made a triangle I replied 'Not according to my special property'! When I looked at what they had done, I was able to point out that the segments were carefully joined at each vertex.
I then challenged students to figure out what was the special property that I was using. It didn't take long for them to articulate that the two shorter sides need add to give a number bigger than the longest side. My sense is that this realisation was helped by using the concrete segments. 
I then showed them the triangle again and asked what type of triangle it was:
Now they saw that it was an impossible triangle! I told them a story about this. A few years ago, I met with a group of developers from a well-known educational software firm who wanted us to see their product. At one point, they showed us some of the questions that their software automatically generated, including the diagram above with the question 'What is the perimeter of this triangle?' Tongue firmly in cheek, I said 'I will give $20 to anyone who can accurately construct that triangle.' I do remember getting a few bemused looks from the developers before I had to remind them of the triangle inequality. The students enjoyed this anecdote!

For the next property that I wanted to them to learn about, I led them by drawing these two triangles and asking them to identify the largest angle, smallest angle and the 'middle' angle.

Whilst most were able to identify the hypotenuse and explain that they knew it was the longest side, they were not all aware that it was opposite the right angle. It made me realise that how I use the word 'opposite' in this context isn't always intuitive for students, so it was necessary to draw on the appropriate arrows as I said 'opposite':
When I had shown which sides were opposite which angles, I then challenged them to find the second property. It gave me the opportunity to move around the room and listen to the conjectures (of which there were many) and, if necessary, challenge these conjectures. it wasn't long before we were able to summarise our findings: in any triangle, the longest side is opposite the largest angle and the smallest side is opposite the smallest angle.
In retrospect, I would should have pushed this thinking further by drawing not just right-angled triangles but acute and obtuse ones too. I also would include isosceles and equilateral triangles.
Although some might think that both of these properties as quite trivial, I see it as being very important that we make sure our students understand why these work. Firstly, by approaching these properties with activities such as these, we are also meeting expectations from Strand A: Mathematical Thinking. Secondly, if students know these properties, they can be used as a good check for glaring mistakes when they are finding missing lengths and angles in triangles.
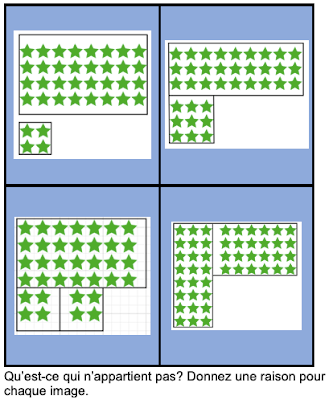
We ended with this challenge:
It was interesting to see that the only triangle that was not identified correctly was the top right one: the right triangle with sides 4cm , 7cm and 8cm. Their reasoning was that it satisfied the triangle inequality so I then had to remind them that if it is a right angled triangle, then it also has to satisfy the Pythagorean Rule.
Many thanks to Mrs. T. Maecker and her two wonderful classes.

Tuesday, May 9, 2023

Developing Some Circle Properties


Circle properties are new to the Grade 9 de-streamed math course here in Ontario. Personally, I have always enjoyed these: not just the proving of them but also solving questions where you have to deduce which properties to use.

Recently I visited a class to help students develop these properties. My approach is to do so using the concrete-diagrammatic-symbolic continuum and to encourage students to make conjectures before we formally prove a particular property. 

I start by giving every student a paper circle and a sheet with four sections for each of the properties we are going to explore. My first instruction is to fold the circle in half and I demonstrate with my own larger circle. It is worth your while making sire every student does this accurately: some will need your help. Then I simply ask: what have you just made. Most are comfortable in replying that the fold we have made is in fact the diameter. Then I tell them to fold it in half again; in doing so, most can tell me that we have now found the centre of the circle so we can now mark this on and draw the radius. I also ask them to draw the corresponding radius on the opposite side. 
The next step is to fold the circle so that the radius on one side of the circle lines up with the radius on the other side. In doing so we create a chord (which we draw on and label) that is perpendicular to the radius. 
It is worth your while to check that your students make this fold accurately and that the chord is 90˚ to the radius. Now I ask the students to think about anything that they notice and wonder. This, in essence, is a conjecture and they write this down on their sheet:
In this particular case, most of the students noticed that the radius appears to perpendicular bisect the chord and ask them to check this conjecture with a ruler. After they confirm that seems to be the case, I then ask if it will always be the case and show them this Geogebra demo:
Of course, this still doesn't prove that it works for all cases so now I prove to them why it is always true. I love showing proofs like this to students as, once they see it, it is very visual and intuitive. I also think it is so important that they get to see what a proof is and to know why something is always true (as opposed to just trusting me that it is). The key thing here is that when we add the radii to the diagram we create two right-angled triangles and from there we use the Pythagorean rule:
Once we have proved this property, we write a formal definition in the section on their sheet marked 'Theorem'.
The next property we look at is angles in a semi-circle. On their sheets I ask them to mark a point P on the circumference of the circle and to join this to the end points (A and B) of the diameter. They repeat this for a second point, Q, and again I ask them to make a conjecture:
In one class I did this, one student made a conjecture that the 'higher up the point, the larger the area of the triangle'. I had never heard this before so we spent a couple of enjoyable minutes thinking about the truth of this statement (I will leave it to the reader to prove this!).
Most students conjectured that the angles were right angles and we checked this with either protractors or the corner of a sheet of paper before I showed this Geogebra demo:

Again, this is not a proof per-se, so I then walk them through a visual proof as seen below. The key thing I emphasise here is that when you draw on radii in a circle, you can create isosceles triangles galore!
Again, after we prove this property we write this as a formal theorem on our sheet.

The next property we look at is angles in the same sector (or angles subtended from a chord). We start by marking two points, M and N, on the circumference and joining these to make a chord. Now we join points P, Q and R to the endpoints of this chord (as shown) to create three angles:
Most students made the conjecture that these angles were equal, so I gave them tracing paper to confirm that this was the case (they simply drew the angle P and placed it on angles Q and R to see that they were equal). A quick Geogebra demo also illustrates this idea:
The proof of this property follows more naturally from the last one we look at so we then write the formal theorem:
The final property we look at (angles at the circumference are half the angle at the centre of a circle) is what I used to think of as the Star Trek property! Again, we start by drawing a chord MN and joining the centre, O, to the endpoints M and N. We do this also for a point A on the circumference: for the sake of visual clarity, I suggest a point towards the top of the circle.
Not as many students were as confident about making a conjecture for this property but when some suggested that the angle at the centre was double the angle at the circumference, I asked them to check this with their tracing paper: they traced the angle at the centre, folded it in half and then checked that this was the same as angle A. Again, we illustrated this with Geogebra:
Again, we can prove this visually by making use of isosceles triangles:


Now we know this, the third property can be proved simply:
I like to finish the lesson by giving this real-life challenge: how can you find the middle of a circle if you cannot fold it. For example, hopw would you find the centre of this wooden circle if you needed to drill a whole in the centre?
Most groups simply want to estimate where the diameter might be and draw two of these to get an approximate centre, but this group used the second property to draw a diameter more accurately by putting a right angle on the circumference:
I then take this idea and show how we can draw two (or more) diameters by using property 2 and thus finding the centre of the circle:

The slides and links that I used for this lesson are part of a presentation that I recently gave at the OAME Annual Conference in Toronto and can be found here.


Friday, December 10, 2021

The 12 Days of Christmath: Day 8

Here are the day 8 puzzles for the 12 Days of Christmath. Enjoy!

Primary

A 'Which One Doesn't Belong?' puzzle! Give a reason why each of the pictures above could be the odd one out?
Primary (French)

A 'Which One Doesn't Belong?' puzzle! Give a reason why each of the pictures above could be the odd one out?

Junior
A 'Which One Doesn't Belong?' puzzle! Give a reason why each of the pictures above could be the odd one out?
Junior (French)
A 'Which One Doesn't Belong?' puzzle! Give a reason why each of the pictures above could be the odd one out?
Intermediate
There is an 8 by 8 grid with 4 elves on the fourth row up in the fourth, fifth, sixth and seventh columns. Divide this grid into four pieces so that each piece is congruent and also contains one elf only.

Thursday, December 9, 2021

The 12 Days of Christmath: Day 7

 Here are the Day 7 puzzles. Enjoy!

Primary

Arrange six pattern blocks to form a 12-pointed star: 2 equilateral triangles, 2 rhombuses, 2 trapeziums.

Primary (French)
Arrange six pattern blocks to form a 12-pointed star: 2 equilateral triangles, 2 rhombuses, 2 trapeziums.
An interactive version of the above puzzles can be found on this Mathigon Polypad page.

Junior

Santa’s nine reindeer (Dasher, Dancer, Prancer, Vixen, Comet, Cupid, Donner, Blitzen and Rudolph) have their own stables. Use these clues to find out which stable each reindeer is in. •	Prancer is next to Comet. •	Vixen’s stable number is half Dasher’s stable number. •	The red-nosed reindeer is in the middle stable. •	The three reindeer with the same initial are next to each other. •	Comet and Cupid are as far apart as possible. •	Donner is next to Rudolph.

Intermediate

Santa's nine reindeer ( Dasher, Dancer, Prancer, Vixen, Comet, Cupid, Donner, Blitzen and Rudolph) will play their favourite game (stable tennis!) and play each other once to see who is the North Pole champion. How many games will be played? What if there were 100 reindeer?


Tuesday, December 7, 2021

The 12 Days of Christmath: Day 5

Here are the Day 5 puzzles for the 12 Days of Christmath. Enjoy!

Primary

Connect each pair of pictures using horizontal and vertical paths without crossing any other path.

Primary (French)

Connect each pair of pictures using horizontal and vertical paths without crossing any other path.
Junior

Connect each pair of pictures using horizontal and vertical paths without crossing any other path.


Junior (French)
Connect each pair of pictures using horizontal and vertical paths without crossing any other path.

Intermediate

Place the numbers 1 to 12 on the 12 points of a 12-pointed star so that the sum of each of the six lines is equal.

You can also try an interactive version of this puzzle
at this Mathigon Polypad link.

Thursday, February 7, 2019

Polygon Angle Sums: Develop, Don't Give.

A common way to get students to see that the sum of three angles is 180° is to get them to tear the three angles and rearrange them to create a straight line. Rather than giving the angle sum formula for any polygon, I wondered if I could use this approach would work with other polygons so as to develop the formula instead. I tried this with a couple of grade 9 Applied classes.
I visibly random grouped the students in to threes and gave each group a different paper quadrilateral. It didn't take long for the to rearrange the angle to form a complete turn and for them to tell me that quadrilaterals have an angle sum of 360°.
Moving on to pentagons, I wanted to make sure that the angle would rearrange clearly into one and half complete turns. I figured that the best way to do this was to give pentagons that had two right angles like this one:
This allowed the students to rearrange like so:
...and then tell me that pentagons have an angle sum of 540°

In a similar way, I then gave each group of students a different, hexagon, heptagon,  or octagon whose angles could be torn off and easily rearranged into full and half turns such as these below:

This nudged the students into quickly rearranging the angles:

As the students were finding the angle sums, I recorded their results using Desmos so that we could all see what was happening:

I could now ask the class "What do you notice? What do you wonder?"
They quickly noticed that the angle sum was increasing by 180° each time the number of sides increased by one. Some students wondered if this was something to do with the angle sum of a triangle.
So, I then sent them in their groups to the vertical whiteboards and asked them (one polygon at a time) do choose a single vertex, and from there, draw as many diagonals as possible to any other vertex. 
As this decomposes the polygon into smaller triangles (each of which has an angle sum of 180°) they could then confirm their earlier results.
I now challenged them to predict the angle sum of a dodecagon. As they were now recording their data in a table, it made it easier for them to spot and extend this pattern:

I followed this by asking them to tell me the angle sum of a 102-sided shape and then to generalise for any shape. They were able to see that each polygon with n sides could be split into (n-2) triangles and so the angle sum is (n-2)×180°. 
This was pleasing as we had not only used the concrete-diagrammatic-symbolic continuum but also the next-near-far-any continuum for patterns. The students seemed pretty chuffed that they had 'discovered' this rule themselves. I finished the lesson by giving them these questions to consolidate what they had just learned.


Monday, December 3, 2018

Nets of Solids

One of my favourite things to teach is nets. The way I teach it is very different to the way I was taught it. Basically, I remember having to look at something like this:
and then say which of these were nets of a cube. As my spatial reasoning was net well-developed, I had trouble with this type of question. When I began teaching, I would 'teach' nets by getting students to cut out and glue something like this:

Whilst this was an improvement on how I learnt, it was all a bit messy and time-consuming. The way I teach now is much better as I get the students to use polydrons. These are two-dimensional shapes that click together to form nets that can be folded together to form a solid.
I visited two Grade 5 classes recently and, having explained what a net was, challenged the students to find as many nets of a cube as they could. The students were randomly grouped into threes and, to help them record their results, I provided one sheet of grid paper to each group.
Each group got stuck into the challenge immediately. The wonderful thing about polydrons is that it is that it is so quick for students to either prove that their net works:
 Or to disprove:

 After about ten minutes, I always get this question from students: are these two nets the same:
It is a perfect opportunity to stop the class and get their views: some say they are the same, others say that they are different. I can then tell them that to a mathematician, they are the same as they are congruent: they are exactly the same size and shape. I can even show this to the students by reflecting or rotating the nets so that they coincide.
Sooner or later, the students ask me how many nets there are so I tell them that there are eleven. If any student find this net, I make sure that they know that it is my favourite net:

 And if they find this one, I will tell them that this is the one net that I still can't believe folds to make a cube:

At the end of class, we then summarised our results: success! we had found all eleven.

 I revisited one of these classes the next day to follow up with this challenge: Find as many nets as you can of a triangular-based prism. It was fascinating to see how well the students were using their spatial reasoning to discover these nets. Again, some worked:
 And some didn't:
 Again, the students recorded their results on grid paper, taking a bit more care to draw the triangular faces:
 When students found this net, I made sure that they knew that it was my favourite:
 It was another successful lesson and at the end, I consolidated by showing all the solutions that the students found and showed them how a mathematician might classify these:
Having done all this investigation, students will now be in a better position to look at the first picture at the top of this post and use their spatial reasoning to decide which of these are nets.