Recently I visited a class to help students develop these properties. My approach is to do so using the concrete-diagrammatic-symbolic continuum and to encourage students to make conjectures before we formally prove a particular property.
I start by giving every student a paper circle and a sheet with four sections for each of the properties we are going to explore. My first instruction is to fold the circle in half and I demonstrate with my own larger circle. It is worth your while making sire every student does this accurately: some will need your help. Then I simply ask: what have you just made. Most are comfortable in replying that the fold we have made is in fact the diameter. Then I tell them to fold it in half again; in doing so, most can tell me that we have now found the centre of the circle so we can now mark this on and draw the radius. I also ask them to draw the corresponding radius on the opposite side.
The next step is to fold the circle so that the radius on one side of the circle lines up with the radius on the other side. In doing so we create a chord (which we draw on and label) that is perpendicular to the radius.

It is worth your while to check that your students make this fold accurately and that the chord is 90˚ to the radius. Now I ask the students to think about anything that they notice and wonder. This, in essence, is a conjecture and they write this down on their sheet:

In this particular case, most of the students noticed that the radius appears to perpendicular bisect the chord and ask them to check this conjecture with a ruler. After they confirm that seems to be the case, I then ask if it will always be the case and show them this Geogebra demo:
Of course, this still doesn't prove that it works for all cases so now I prove to them why it is always true. I love showing proofs like this to students as, once they see it, it is very visual and intuitive. I also think it is so important that they get to see what a proof is and to know why something is always true (as opposed to just trusting me that it is). The key thing here is that when we add the radii to the diagram we create two right-angled triangles and from there we use the Pythagorean rule:

Once we have proved this property, we write a formal definition in the section on their sheet marked 'Theorem'.
The next property we look at is angles in a semi-circle. On their sheets I ask them to mark a point P on the circumference of the circle and to join this to the end points (A and B) of the diameter. They repeat this for a second point, Q, and again I ask them to make a conjecture:
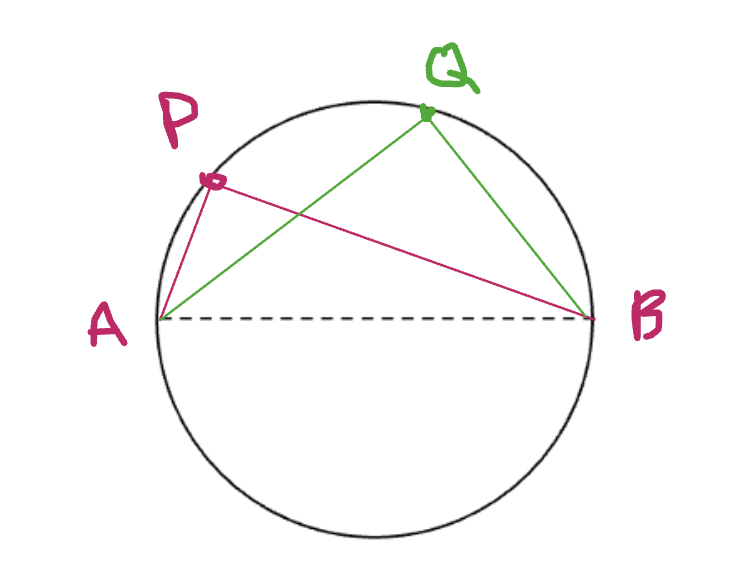
Most students conjectured that the angles were right angles and we checked this with either protractors or the corner of a sheet of paper before I showed this Geogebra demo:
Again, this is not a proof per-se, so I then walk them through a visual proof as seen below. The key thing I emphasise here is that when you draw on radii in a circle, you can create isosceles triangles galore!

Again, after we prove this property we write this as a formal theorem on our sheet.
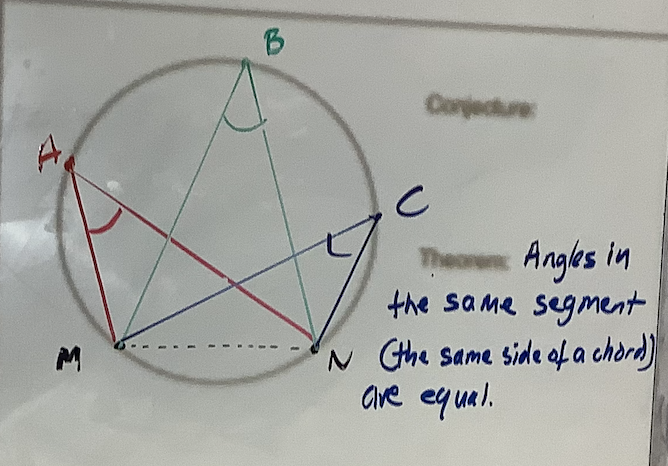
The next property we look at is angles in the same sector (or angles subtended from a chord). We start by marking two points, M and N, on the circumference and joining these to make a chord. Now we join points P, Q and R to the endpoints of this chord (as shown) to create three angles:

Most students made the conjecture that these angles were equal, so I gave them tracing paper to confirm that this was the case (they simply drew the angle P and placed it on angles Q and R to see that they were equal). A quick Geogebra demo also illustrates this idea:
The proof of this property follows more naturally from the last one we look at so we then write the formal theorem:
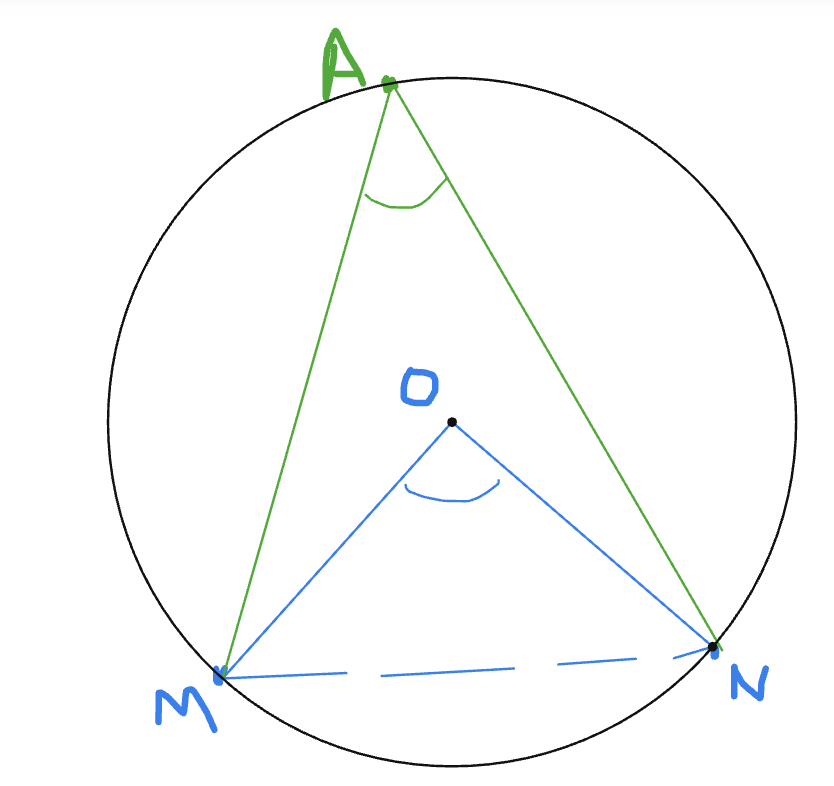
Again, we can prove this visually by making use of isosceles triangles:

Now we know this, the third property can be proved simply:

I like to finish the lesson by giving this real-life challenge: how can you find the middle of a circle if you cannot fold it. For example, hopw would you find the centre of this wooden circle if you needed to drill a whole in the centre?


I then take this idea and show how we can draw two (or more) diameters by using property 2 and thus finding the centre of the circle:
The slides and links that I used for this lesson are part of a presentation that I recently gave at the OAME Annual Conference in Toronto and can be found here.